

Saturday, December 22, 2007
Friday, December 21, 2007
Finally Friday Challenge
Happy Friday!!!

I was just visiting Erin's blog and saw that she has a new post for her "It's Finally Friday Challenge!" This week, Erin is challenging everyone to make a project about celebrating or being happy. She got her new Stampin' Up! Spring/Summer Collection catalog and feels like celebrating. I wish I had mine, should be here today though! Then I'll be celebrating too!
Although I don't have time to stamp today, way too busy with the Christmas crunch, I do have a card that I made recently that fits the rules of this challenge, so I thought I would share. Hope this inspires you to take on the "It's Finally Friday Challenge" too! Have fun!
This card is a gel card, it's suppose to give the illusion of the stamped image being in water. Not sure if you are able to see the bubbles from the gel, but there is gel over the jelly fish. For a good tutorial on how to make these cards visit SCS.
For the paper colors I used Night of Navy, Brocade Blue, Black, and White cardstock. I used the Fishy Wheel to create a background on the Brocade. I cut two ovals, using my Coluzzle cutter, one on the Brocade and one on the Black. I then put them together to create a matte effect. Next, I stamped and colored the jelly fish image (this stamp is from the retired set Fishy Friends from Stampin' Up!) on the White.
Now for the fun part... I used a tiny ziplock baggie (the size you might use to store jewelry) that I found in the craft section at Wal-Mart to hold the gel. Fill the baggie with a small amount of hair gel, about the size of a nickel or quarter, seal the baggie and smooth out the gel to fill the bag to the edges.
Next, glue the filled gel baggie to the back of the Black oval and then adhere the White stamped image piece over the baggie. Now you should have the image showing through the ovals, like a window or framed piece of art. Hope that makes sense.
I attached some ribbon in black and blues and then mounted my finished matte piece to the Night of Navy card base. Lastly, I stamped Happy Birthday at the top of my card. This stamp is from stamp set Happy Everything from Stampin' Up! Hope you like it. Give the gel (water) card a try! Happy Holidays Everyone! :)
Wednesday, December 19, 2007
Whimsical Wednesday Challenge - Week 2
Happy Wednesday Everyone,
Hope this last week before the holidays is going well for all of you. I just finished up some last minute shopping this morning so forgive me for not getting my Challenge posted earlier. I think I'm finally completely done shopping!
This week I was inspired to create a criss cross card after seeing the beautiful card Erin made and posted on her blog. It's a great card with an easy to follow "how-to" posted as well. Check it out!

For my attempt at the criss cross card, I used some Wintergreen and Bali Breeze DSP from Stampin' Up!. Bali Breeze will be available in the new Spring Summer Catalog that comes out in January.
The base of my card is Certainly Celery. I cut 2 pieces, both 5 1/2 inches X 4 1/4 inches. I used one as the card base and then cut the other piece diagonally to use as the criss cross front pieces.
I also cut 2 pieces of DSP. Each piece is 5 inches X 3 3/4 inches. After cutting to that size, I cut each piece diagonally. Because I chose to use two different Designer Prints, I have the 2 left over diagonal pieces to use at a later time. If you choose to use only one double sided piece of DSP, you can just cut one piece to size and then cut it diagonally.
Next, I cut a Whisper White piece of cardstock 5 inches X 3 1/2 inches for the card insert.
Once all my pieces were cut, I glued the DSP to the diagonal criss cross front pieces and then glued the criss cross pieces to the card base and set aside.
For the card front, I used the hippo stamp from Bundled in Love. I used Purely Pomegranate ink and an Aquapainter to color in the hippo. I added a little rhinestone brad to the bow and some glitter to her feet. I think it adds a touch of whimsy!
I attached some ribbon and then glued the hippo image to the card front. Lastly, I embellished with some glitter on the Wintergreen side of the criss cross. I layered the hippo on Celery and Pomegranate cardstock.
For the insert, I added a tab and rhinestone brad and a little stamp "for baby" also from the Bundled in Love stamp set.
Now it's your turn to give this week's challenge a try. Use a different color combo or try a new technique, just put aside some time for yourself and do something you enjoy. Happy Stamping!
Monday, December 17, 2007
Weekly Tutorial - Nugget Tins
This week's tutorial is putting together a simple candy gift idea using Hershey Nuggets Candies and metal tins. I found a great tutorial on SCS, here's the link, if you don't have or can't get the tins in time for the holidays. The SCS tutorial shows you how to make your boxes.
How To:

My tutorial will be a quick "how to" using the tins I found at specialtybottle.com. These tins are size code THN8. They cost me approximately $1.35 each with the shipping charges.
Supplies:
Hinged cover metal tin, Hershey Nuggets Candy, printed/designer paper, cutter, adhesive, ribbon, embellishments
How To:
1. Cut your printed paper (for mine I used Dashing DSP from Stampin' Up!) into strips. Each strip will need to be 1 inch X 3 1/4 inches. You will need 12 strips to complete this project.
2. Adhere one strip to each nugget, creating a new sleeve or cover for each piece of candy. You will need 12 nuggets to fill each tin.
3. Once your candies are covered, put them into the metal tin.
4. Wrap the tin with ribbons and add some embellishments. I used a tag with a stamped image and a little hemp twine to attach the tag.
It's really that simple! I plan to leave one for my postman and some for the UPS delivery guys. Just a little something to wish them a Merry Christmas! Quick and easy and very inexpensive!
Friday, December 14, 2007
December Stamp Club Projects
Hello,
I held my monthly stamp club meeting last night and wanted to share a couple of the projects that we made. These projects would make great holiday gifts and are simple and inexpensive to create. By the way, club was a blast! Thanks to the girls who attended, it's always fun to stamp with you guys! :)
The first project is an acetate treat box filled with candy. After cutting and scoring the acetate, I stamped snowflakes in white StazOn ink and then put the boxes together. I made a topper from a scrap piece of paper, then filled the boxes with candy, closed it up and punched holes using the cropadile, and finally, tied ribbon to hold it closed.
I made one with Peppermint Patties covered with a scalloped punch circles and stamped images and the other treat box is filled with Nuggets wrapped in Dashing Designer Series Paper from Stampin' Up!. For more ideas for using the nugget candies, visit this link on SCS. You could use pretty much any kind of candy you like to fill these boxes.
I found the idea for the acetate boxes on Lauren's blog. She has a great pattern and instructions for making these treat boxes. She also has some beautiful examples posted on her blog. If you don't have acetate you can also use cardstock.

The other project I wanted to share is a stamped candle and matching tile coaster. For a tutorial on stamped tiles, check out my Tutorial posted this past Monday on my blog and for instructions on stamping on candles visit this link at SCS. This project is super easy!

Wednesday, December 12, 2007
Whimsical Wednesday Challenge - Week 1
 Good Morning,
I just finished my first Whimsical Wednesday Challenge! I chose to make a card using some of my new goodies that came yesterday. So exciting, I love getting new stuff!
I made this card a bit different though. Lately, I've been playing around with different folds trying to get some ideas for wedding invitations. I'm going to be making some for my brother. He's getting married next summer, so I have time, but creating something as special as a wedding invite is huge for me. I've never done anything like that!
This card is 5"x11", scored on 3" and 8" to make a tri-fold design. The color combo here is Black, Whisper White, and Perfect Plum, inspired by the colors for my brother's wedding. This is a color combo I haven't tried before. I really like it and may use it again sometime!
I just received Embrace Life, a new Spring/Summer Collection stamp set, yesterday with the rest of my new Stampin' Up! goodies. So this is also a little Sneak Peak for you! I love the set, it's so pretty and I think I'll be able to find a lot of uses for it too. I stamped the images in Black and used Plum and an aquapainter to fill in the flowers. I added a little Wild Wasabi to the stems to make them pop a bit. I cut out the bigger flowers and folded the edges up slightly to give them more of a 3D effect.
When I was finished the stamping and assembly, I then added a few rhinestone brads, some glitter touches, and ribbon in Eggplant Grosgrain and White Organdy. I do hope that Stampin' Up! will bring back the organdy ribbon!
 For the inside of the card I used the same color combo as the outside, but also added a piece of Cardstock Vellum. Cardstock Vellum is a bit sturdier than the regular Vellum.
I stamped the flowers and colored them in just as I did on the front. Then added the Vellum over the White and Plum layers and attached with Silver Eyelets and White Organdy ribbon.
I added a Your Invited stamp on the Vellum. This stamp is a Stampin' Up! stamp from the set Hugs and Wishes.
So that's it! Now it's your turn to try this week's challenge. Remember to post your creations on your blog or another gallery and then post the link on my blog so we can all take a look at what you came up with. Have fun and happy stamping! :)
Tuesday, December 11, 2007
I've been tagged...
I've been tagged by Katie, so here goes...7 interesting things about me, hummmm....
1. I live in very chilly (right now, anyway) New Hampshire! I love it here, except during this time of the year. I really hate the cold, but still couldn't imagine living anywhere else! I lived in NH all my life.
2. I have two kids, Connor and Emma. They keep me on my toes all day everyday! I'm a stay at home mom and in my free time, I'm a Stampin' Up! demo, thanks to my upline and good friend Erin who got me hooked on stampin'.
3. We have 2 Golden Retrievers, Indy and Tana, and 2 cats, Tigger and Nike. Tigger is a Maine Coon and recently had to be shaved down because he had mats that we couldn't brush. Needless to say, he's not looking all that pretty right now!
4. I'm almost finished all my holiday shopping and for me, that's huge! We are the ones who are usually at the stores a few days before Christmas to find those last minute gifts. It feels great to be almost done! I think I only have a Yankee Swap gift left...what to get?
5. I used to be an elementary school title one teacher before I left to have kids. I do miss working with the kids, but I wouldn't trade my "new" job for anything. I'm very lucky to stay home with my kids everyday! Some days I do need to remind myself of that fact though! :)
6. I like to "stalk" SCS and now my new blogging sisters for new ideas and inspiration. I may even try to get some stamping in today. We shall see...
7. I'm waiting for my new Stampin' Up! pre order to arrive. It should be here today!! Yeah!!! Can't wait to see all my new goodies! Yes, I'm an addict! :)
Now, it's my turn to tag...
Erin
Sandy
Lynn W
Elaine
Jana
And YOU too, if you want. Let me know your blog address and I'll visit you.
Monday, December 10, 2007
Weekly Tutorial - Stamped Tile Coasters
 This week's tutorial will involve stamping on tile to create a set of Tile Coasters. You will only need a few supplies to complete this simple project.
Supplies: Stamps, tile (natural stone works best), StazOn Ink and StazOn Cleaner, ribbon.
I purchased my tile at Home Depot. This tile is available in a box of 9 for about $6 or separately for less than $1. The tiles used here are 4x4 Travertine tiles. When used as coasters, these natural stone tiles will absorb water from glasses without needing to be sealed.
1. Clean all tiles with a damp cloth and set aside to dry for a few minutes. This will help to remove some of the dry dusty grit that coats the tiles.
2. Using your StazOn ink (this is a permanent ink that will not need to be sealed), ink your stamp image and then stamp the tile. Repeat for the desired look. StazOn ink can be found at your local craft store in a variety of colors. Currently, Stampin' Up! only carries Jet Black, Timber Brown and White.

3. Stamp excess ink on a piece of scrap paper and then clean with your StazOn cleaner. The quicker you clean this ink, the easier it is to remove from the stamp. Some staining will occur.
4. Repeat steps 1 through 3 to make a complete set of Tile Coasters. I would stamp at least 2 or 4 tiles per set.
5. Stack your tiles and wrap in ribbon to complete this project. This simple, inexpensive project makes a great gift.
 For more information or project ideas with stamped tiles, visit this link.
Friday, December 7, 2007
Whimsical Wednesday Challenges
I’ve decided to add a weekly challenge to my blog in an effort to get others and myself stamping more often. We’re all so busy sometimes that we forget about taking time out for ourselves. Time to do the things we love and enjoy.
Each weekly challenge will be about thinking outside the box and letting loose a little bit and not worrying too much if things aren’t totally perfect. For some of us, ummm ME, this is often very hard to do! So, I’m challenging myself (and you too, if you’re willing) to use a stamp set or tool or color combo or even an embellishment that you’ve never used or haven’t used in a while to create something fun and maybe, if the spirit moves you, even something whimsical!
The best part of a handmade card or other craft project is the freedom the creator has to make it her own. We all have differing tastes, so share yours with us. We can all use a little inspiration. Join me each week for the Whimsical Wednesday Challenge and let those creative juices flow!
I’ll try to post my project on Wednesday mornings. Just don’t hold me to that each week; sometimes my kids dictate my schedule! Please post your creations on your blog or on another public gallery, such as SCS. Then post a comment on my blog with a link to where your challenge project can be viewed so that we may all take a look. Good luck and thanks for participating in the challenge! And remember, have FUN!
Stay tuned for the first Whimsical Wednesday Challenge, posting on December 12th!
Wednesday, December 5, 2007
Here it is....
So, I finally finished my holiday cards! YEAH! I'm so exciting to be able to cross that off my to do list! Thanks to all who posted comments, it was really great to get your feedback. Here is my finished card. I'm really happy with the way it turned out. I just hope all the piece stay glued together!

Monday, December 3, 2007
A Little Help Please
 I was out cruisin' the blog scene this morning looking for some inspiration and I came across a card layout that I liked on Beate's blog from an old sketch challenge she did. She has some really beautiful cards, check out her site sometime!
 Anyway, I decided to see what I do with the layout design to make my holiday cards for this year. I've been procrastinating quite a bit and need to get going!
I just got my order of Wintergreen DSP and wanted to be able to use it to avoid having to do a lot of stamping. I need to make about 40 cards and with 2 small children, there's not always a lot of time to get things done!
So, this is what I came up with. I think I might make some minor changes, like adding more Blue Bayou CS and layering the ovals, but other that I'm not sure what else to do or if I should just leave it alone.
I'd love to hear what you all think. Any suggestions or comments would be great! :)
Another Gift Idea
Good Monday Morning,
Hope everyone had a great weekend. We tried to get some shopping done. Not finished yet of course! It's snowing here now, about 5 or 6 inches so far! I guess I won't be venturing out today. Maybe we'll have a white Christmas this year.
I have another gift idea to share with all of you. We have a family friend that recently had a baby and I wanted to send a little something to them. I had one of Stampin' Up!'s 9x9 clipboards in my stash along with new Designer Paper that I just got last week. So I pulled out everything I needed and got to work.
This is my finished project! I think it came out cute. I was stuck for a while wondering if it needed anything else, but in the end I decided to leave it as is. Every time I added something, I just wasn't sure. When in doubt, stop!
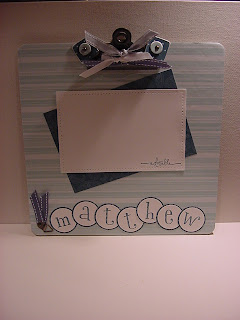
All our friend needs to do now is add a picture and the display is done!
For supplies you will need:
Clipboard, paper, craft glue, and embellishments. Here I used the circle punches, ribbons, hodgepodge hardware, cropadile, and chipboard.
Have fun creating your own custom picture display!
Hope everyone had a great weekend. We tried to get some shopping done. Not finished yet of course! It's snowing here now, about 5 or 6 inches so far! I guess I won't be venturing out today. Maybe we'll have a white Christmas this year.
I have another gift idea to share with all of you. We have a family friend that recently had a baby and I wanted to send a little something to them. I had one of Stampin' Up!'s 9x9 clipboards in my stash along with new Designer Paper that I just got last week. So I pulled out everything I needed and got to work.
This is my finished project! I think it came out cute. I was stuck for a while wondering if it needed anything else, but in the end I decided to leave it as is. Every time I added something, I just wasn't sure. When in doubt, stop!
All our friend needs to do now is add a picture and the display is done!
For supplies you will need:
Clipboard, paper, craft glue, and embellishments. Here I used the circle punches, ribbons, hodgepodge hardware, cropadile, and chipboard.
Have fun creating your own custom picture display!
Sunday, December 2, 2007
Sisterhood of the Blogging Stampers-3
 I just joined a blog group, Sisterhood of the Blogging Stampers-3. It's a group of creative stampers and scrappers. I'm looking forward to having a "stamping sisterhood" of creative minds to bounce ideas off of and share resources with. And it will be nice to make some new friends in this vast cyber world!
 A little about me for other group members....I'm a SAHM of 2 children and part time I'm a Stampin' Up! demo. I've been stamping for a few years, but have only been a demo for 9 or so months. When I have free time, I love to stamp. I've done some scrap booking, but mostly I'm addicted to all things stamping. I like to "stalk" SCS and read blogs for creative ideas. Stamping has given me a chance to meet new people and connect in a creative way.
Look forward to meeting all the group members and getting to talk stampin'!
Look forward to meeting all the group members and getting to talk stampin'!
Subscribe to:
Posts (Atom)